
STEP BY STEP GUIDE TO SET UP SPF WITH YNOT MAIL #
Setting up an SPF record for your sending domain is rather straightforward. We’ll start with the quick, no-details instructions for those of you already familiar with this process, then move on to the detailed instructions for those of you who need a thorough explanation.
THE QUICK EXPLANATION: SETTING UP SPF #
- Log into your sending domain’s DNS platform.
- Add a new TXT record.
- For the ‘Record name’ put: @
- For the ‘Value’ put: v=spf1 include:_spf.ynotmail.com ?all
- Save your changes, wait for them to propagate.
THE DETAILED EXPLANATION: SETTING UP SPF #
If you’re confused by the above, or already have an SPF record setup and need help modifying it to include YNOT Mail, then follow the below steps instead.
Step 1: Understand SPF Records #
An SPF record is a TXT record that is part of your domain’s DNS (Domain Name Service). It specifies which mail servers are permitted to send email on behalf of your domains.
Step 2: Ready Your SPF Record’s ‘Value’ Text
#
Start by creating the ‘Value’ text for the SPF record that you’ll be adding for any domain names that you’ll be sending email from through YNOT Mail.
Unless you have a custom setup with YNOT Mail, this is the record’s ‘Value’ text you’ll need to jot down:
v=spf1 include:_spf.ynotmail.com ?all
Or do you already have an existing SPF record? In that case, all you need to do is insert include:_spf.ynotmail.com right before its ending mechanism. For example, with an SPF record Value text that looks like v=spf1 a -all, just modify it to look like v=spf1 a instead.include:_spf.ynotmail.com -all
Step 3: Publish Your New SPF Record #
Now that you know the ‘Value’ text needed for your sending domain’s SPF record, you can proceed. You can change your domain’s DNS settings through its DNS service, which is typically your hosting provider or domain registrar. Exact procedures will vary based on who you’re using, however in a general sense you’ll want to do the following:
-
- Access your sending domain’s DNS settings.
- Add a new TXT record to your sending domain.
- For the Record Name, put ‘@’ without the quotes.
- For the record’s ‘Value’ field, copy/paste the text you created above in Step 2.
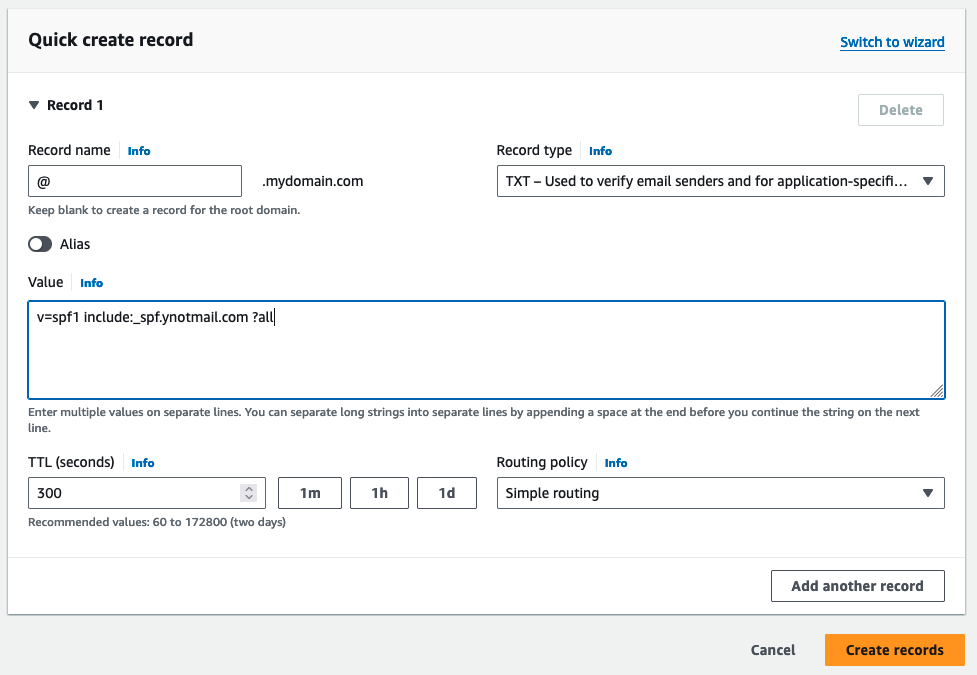
Here’s an example of how this might look in using Amazon’s DNS tool Route 53, but note your DNS provider may look differently:
Step 4: Verify the SPF Record is working properly
#
Changes to DNS records take time to propagate, sometimes as long as 48 hours, though typically much, much faster. Once changes have propagated, you have two good options to make sure your SPF record is working as-intended:
- Option 1 | Use an SPF record checker tool online to verify that your SPF record is correctly set up.
- Option 2 | Just reach out to support and we’ll check for you.
IMPORTANT TIPS FOR SPF SUCCESS #
- Avoid Multiple SPF Records: A domain should only have one SPF record. Having multiple SPF records can lead to authorization problems.
- Syntax Matters: SPF records must follow a specific syntax. Incorrect syntax can lead to SPF validation failure.
- Use Soft Fail Over Hard Fail: If you’re going to change your ending mechanism to something more specific,
~all(soft fail) is generally recommended over-all(hard fail), especially initially, to avoid legitimate emails being rejected. - Limitations: SPF alone doesn’t protect against all types of email spoofing. Consider also implementing DKIM and DMARC for stronger email authentication.


