STEP BY STEP GUIDE TO SET UP DKIM WITH YNOT MAIL #
DKIM (DomainKeys Identified Mail) is one of several widely adopted email authentication methods. Once DKIM is set up and working, it allows YNOT Mail to attach a digital signature to your email headers. This signature, which we link directly to your “From” domain (aka the ‘sending domain’), can be verified by receiving mail servers against a public key that you publish in the sending domain’s DNS records.
When an email from YNOT Mail is received at its destination, the receiving server (like Gmail) performs a DKIM check by retrieving your public key via DNS and using it to verify the signature’s authenticity. This process ensures that the email has not been altered in transit and helps to confirm the legitimacy of the email, thereby reducing the risk of email spoofing and phishing attacks that use your domain names. DKIM is a crucial component in the broader spectrum of email security and deliverability strategies.
Setting up DKIM with YNOT Mail involves just a few steps to prepare your sending domain(s), and once done it helps improve email deliverability and security. In fact, as of 2024, some of the big inbox providers like Google and Yahoo are requiring it.
Here’s a general guide on how to get DKIM working with your YNOT Mail account:
THE QUICK EXPLANATION: SETTING UP DKIM #
- Open a support ticket and request DKIM setup for your sending domain.
- Wait for a response back from YNOT Mail Support (typically within 1 business day).
- Visit your DNS provider for your sending domain and log in.
- Create a new CNAME record for each required DNS entry given to you by Support.
- Save your changes, wait for them to propagate.
THE DETAILED EXPLANATION: SETTING UP DKIM #
Need more details than that? We’ve got you covered. Just follow the steps below to set up DKIM authentication with YNOT Mail.
Step 1: Declare Your Sending Domain(s) with YNOT Mail Support #
Before you can setup DKIM properly on your side, you need to obtain domain-specific text that you’ll use in Step 2 below. Here’s how to do that:
- Contact Support. Open a support ticket with YNOT Mail Support. Indicate that you are setting up DKIM for your sending domains, and include all the domains you plan to send email from while using YNOT Mail. For example if you’re sending from newsletter@mydomain.com, then ‘mydomain.com’ is your sending domain. YNOT Mail Support will use this information to setup your domain for DKIM signing on our side, then respond back to you.
- Receive Your DKIM Record Back. Once YNOT Mail Support responds, use the ‘Host/Name’ text and the ‘Value’ text you received to complete the DKIM setup with your DNS provider. (DKIM text is different from SPF and DMARC in that it’s unique to you.)
Step 2: Create a CNAME Record for DKIM #
After receiving your DKIM text for your sending domain(s), head over to your domain registrar (where you purchased your domain) or to your DNS host (if different). You may need to repeat this process multiple times depending on how many records you were provided by YNOT Mail Support.
- Access Your Domain’s DNS Settings. Log in to the website of the sending domain’s registrar or DNS host.
- Add a New CNAME Record. Find the option to manage your DNS settings for that domain and add a new CNAME record.
- Enter Record Details. Enter the values provided by YNOT Mail Support, then save and apply them.
- Repeat As Needed. If you have additional CNAME records to add, repeat Step 2 as often as needed.
You’ll get back from YNOT Mail that looks something like this below. The text to the left of CNAME is what goes in your “Host/Name” field, and the text to the right is what goes in the “Value” field. Make one separate CNAME record for each line.
em2374.mydomain.com CNAME em2374.u1295.ynotmail.com m1._domainkey.mydomain.com CNAME m1.dk.em9374.u1295.ynotmail.com m2._domainkey.mydomain.com CNAME m2.dk.em9374.u1295.ynotmail.com |
While every DNS provider is different, here’s how it might look if you were using Amazon Route 53 for your DNS host:
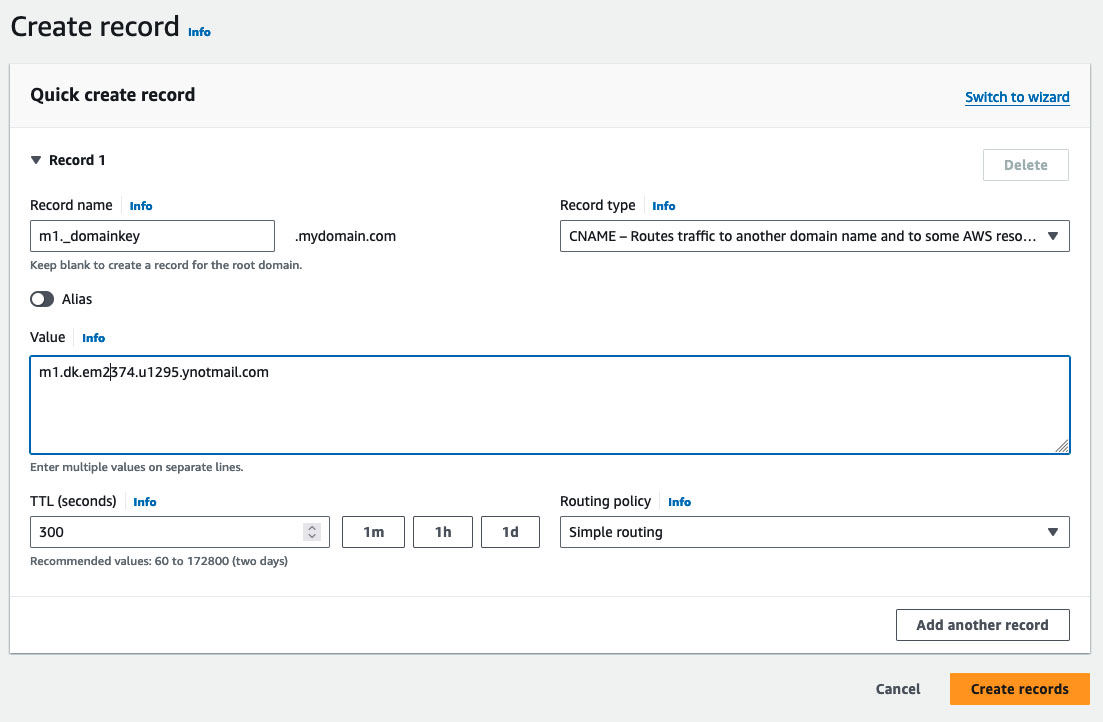
Step 3: Wait for DNS Propagation #
After adding the CNAME record, it might take some time (up to 48 hours, but often much quicker) for these changes to propagate across the internet.
| IMPORTANT: You should wait until DKIM changes have propagated and is confirmed working until you setup your DMARC policy. This is because DMARC checks to make sure both SPF and also DKIM are setup, so you’ll want both of those authentications working first before adding DMARC. |
Once you have completed these steps, you should have DKIM set up for your domain in YNOT Mail, which will help to improve your email deliverability and reduce the likelihood of your emails being marked as spam. If you also have finished setting up your SPF record(s) then you can now safely look into DMARC setup, the final required email authentication system.
Remember if you need personalized help, please reach out to YNOT Mail support.


