STEP BY STEP GUIDE TO SET UP DMARC WITH YNOT MAIL #
Should you bother setting this up? Absolutely. As of 2024 it’s now required for proper delivery to Gmail and Yahoo inboxes, and will help increase your delivery rates almost everywhere else too. Setting it up is rather simple once SPF and DKIM have both been set up, so there’s no good reason to pass on DMARC.
| IMPORTANT: Don’t forget that DMARC relies on two other email authentication methods, SPF and DKIM, both of which should be properly configured before implementing DMARC. |
Setting up DMARC (Domain-based Message Authentication, Reporting, and Conformance) for your domain when using MailChimp for email campaigns involves several steps. DMARC relies on two other email authentication methods, SPF (Sender Policy Framework) and DKIM (DomainKeys Identified Mail), both of which should be properly configured before implementing DMARC.
Here’s a step-by-step guide:
THE QUICK EXPLANATION: SETTING UP DMARC #
All done! Have questions or need more details? See below. |
THE DETAILED EXPLANATION: SETTING UP DMARC #
Want a more detailed guide? See below.
Step 1: Decide on a DMARC Policy #
You have a few options for how you can set your DMARC policy.
p=none: Monitoring mode; takes no action against emails that fail DMARC.p=quarantine: Emails that fail DMARC are moved to the spam/junk folder.p=reject: Emails that fail DMARC are rejected.
We strongly recommend you set your policy to None unless you’re sure you know what you’re doing. This protects you from emails not getting delivered in case something isn’t set up correctly. You can always move to a more restrictive policy later on.
Step 2: Create the DMARC Record #
- Log into the DNS provider for the domain name of your sending email address. This is usually the registrar where you bought your domain.
- Navigate to DNS settings for your sending domain.
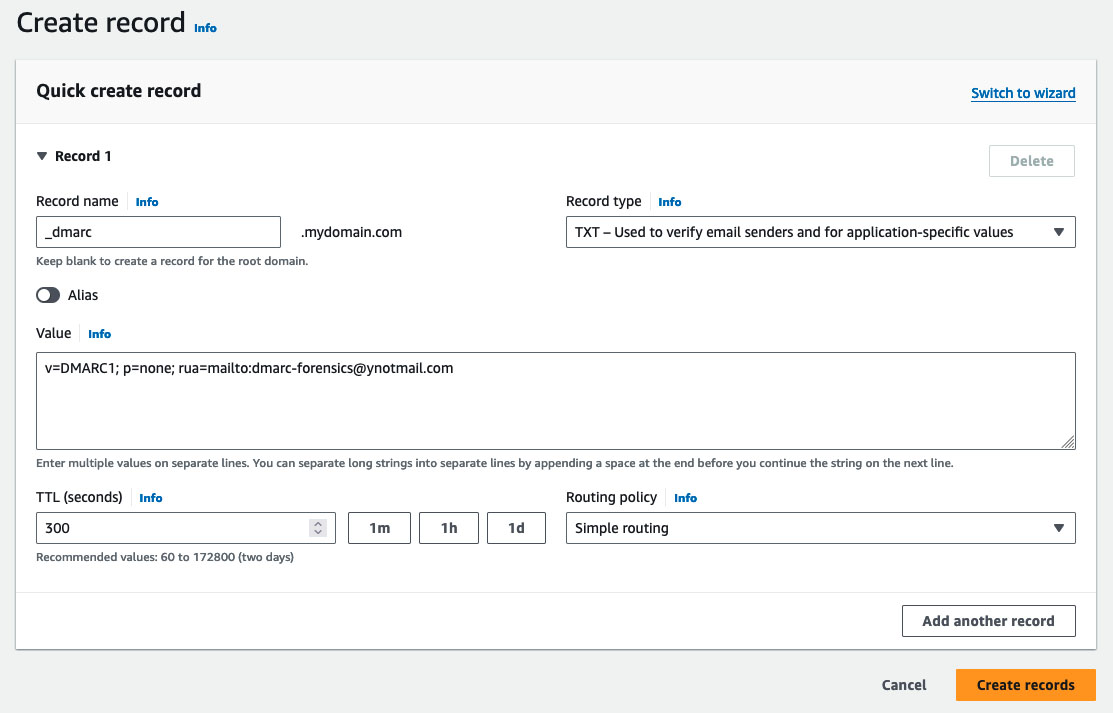
- Create a new TXT record and set the ‘Name/Server’ field to: ‘_dmarc’ (without the quotes).
- For the ‘Value’ field, enter this:
v=DMARC1; p=none; rua=mailto:dmarc-forensics@ynotmail.com
- Save any changes and wait for them to propagate.